Fruit and Nut Chocolate Bark


It's the season where everyone is looking for the perfect gifts for their loved ones. It's all the more special if its something homemade, something that looks fabulous and at the same time requires so little effort. These bars are so easy to make and there is no baking involved!! It's just the thing to involve your kids in and they'd be so excited! Melt the best chocolate you can find and top it with your favorite fruits and nuts and pack them in cute little bags and you've got the perfect gift! And Chocolate does make one Smile!!

Fruit and Nut Chocolate Bark


Ingredients:
12oz bittersweet/ semisweet/ milk chocolate
1/2 cup mixed dry fruits (raisins, cranberries, apricots)
1/2 cup mixed nuts, roasted and chopped roughly (almonds, pistachios or any other nuts)


Method:
Line a 9" square pan with parchment paper, coming up the sides a little bit.
Take the chocolate in a bowl and place over a bowl of simmering water, making sure that the bottom does not touch the water. Stir occasionally until the chocolate is melted and smooth.
Pour into the prepared pan and swirl the pan to cover the base completely or use a spatula to spread the chocolate into an even layer.
Immediately sprinkle the dry fruits and nuts all over the melted chocolate and press lightly into the chocolate.
Keep aside in a cool and dry place until the chocolate sets.
Once set, cut or break into pieces and store in an airtight container for upto one week.

Sending this to Christmas Food Fair

Chocolate and Vanilla Melting Moments with Chocolate Truffle


Anushka's school closed for holidays last week and as always we had potlucks on the last days of school.  I made these cookies for one of them. They were so buttery and delicious and they literally melt in your mouth.


These snowy pillowy cookies are so apt for this season too.I can't believe that another year is coming to an end so soon, but I do love this time of the year. Love the reds and greens everywhere and the brightly lit trees. Carols playing everywhere and all the yummy treats!


I sandwiched the cookies with some chocolate truffle, but that is just optional. Adding the truffle makes them more of a dessert cookie but I loved them plain too. Recipe is adapted from the Australian Women's Weekly.

Melting Moments


Ingredients:
Vanilla Cookies:
125g  butter, at room temperature
1/2 tsp vanilla extract
1/4 cup icing sugar
3/4 cup all purpose flour
1/4 cup vanilla custard powder or cornflour
icing sugar for sprinkling on the cookies

Chocolate Cookies:
125g butter, at room temperature
1/2 tsp vanilla extract
1/2 cup scant icing sugar
1/2 cup all purpose flour
1/4 cup cocoa
1/4 cup cornflour
icing sugar for sprinkling on the cookies


Method:
Sift the flours together and the cocoa for the chocolate cookies.
Cream the butter, icing sugar and vanilla extract until light and fluffy.
Stir in the sifted flour/ flour cocoa mixture in two batches.
Take small portions of dough (I measured 10g of dough for each cookie) and roll into balls using slightly floured hands. Place about 2 inches aparton a cookies sheet lined with parchment paper.
Flatten slightly with a floured fork. Bake at 350F for about 15 mins. Let stand for 5 minutes and then lift onto wire racks to cool completely.
Sandwich the cookies with chocolate truffle, preserves or buttercream.
Makes about 25 sandwich cookies.

Chocolate Truffle


Ingredients:
100g semi-sweet chocolate
75ml heavy cream
1 tbs butter, softened

Method:
Take the chocolate into a bowl. Heat the cream until you see bubbles at the edges of the pan. Pour the cream on the chocolate and add the butter. Let stand for a couple of minutes, then mix and stir well until the mixture is smooth and well combined.

Sending this to Christmas Food Fair

Fallen Chocolate Soufflé Cake to celebrate 6 years!


Yesterday was yet another occasion that called for an incredibly rich, gooey and chocolaty dessert, our 6th wedding anniversary! No special celebrations as it was the first working day after a really long weekend, but I'm not complaining as we got to spend a whole lot of time together over the long weekend. 


It is wonderful that our anniversary comes around thanksgiving when there are some really good deals for a lot of things and I finally got the much awaited Kitchen Aid mixer. I made two cakes over the weekend when having friends over and then again this one today. Baking is all that I can think of :)


I had borrowed the book, Chocolate and the Art of Low-fat Desserts by Alice Medrich a while back and had decided to make it on this day. This cake is really a chocolate lover's dream. It's just the kind of desert that both of us love, so rich with an intense chocolate flavor. I also love the way it looks, the cracked fallen top is just so attractive. You can check out a video of Alice making the cake here.

Fallen Chocolate Soufflé Cake

Ingredients:
1/4 cup (1.25 ounces) whole almonds
3 tbs (.84 ounces) unbleached all purpose flour
3 ounces bittersweet chocolate (70% cocoa), finely chopped
1/2 cup unsweetened cocoa powder
1 cup (7 ounces) sugar
1/2 cup boiling water
2 egg yolks
1 tbs brandy
4 egg whites, at room temperature
1/4 tsp cream of tartar (I did not use this)
powdered sugar for sprinkling
whipped cream and berries, optional


Method:
Position rack in the bottom third of the oven and preheat oven to 375 F.
Grease and 8"round spring form pan.
Grind the almond with the flour until very fine and set aside. 
In a large bowl, combine the chocolate, cocoa powder and 3/4 cup sugar. Add the boiling water and whisk until the chocolate is completely melted. Whisk in the brandy and the egg yolks and set aside.
Take the egg whites and cream of tartar in a clean and grease free bowl and beat on medium speed until soft peaks form. Sprinkle the remaining sugar over the egg whites and beat on high speed until the egg whites are stiff but not dry.
Whisk the flour and almonds into the chocolate mixture. Fold about a quarter of the egg whites into the chocolate mixture to lighten it. Fold in the remaining egg whites. Scrape the batter into the prepared pan and level the top if necessary.
Bake for 20-25 minutes or until a tooth pick inserted into the center comes out with a few moist crumbs clinging to it. Cool in the pan, on a rack, the cake will sink in the center.
Slide a small knife around the inside of the pan to detach the cake. Remove the sides of the pan and transfer the cake to a serving platter. Store cake at room temperature for one day or freeze for upto two months.
Sprinkle with some powdered sugar and serve at room temperature with berries and cream if you like.


Kale Thoran/ Kale and Coconut Stir Fry


Wish you all a very Happy Thanksgiving! I am so grateful for everything and everyone in my life right now, I may crib and complain about a lot of things all the time, but I know that things are perfect they way they are and I wouldn't change a thing! We have planned a day out today, so no fancy meal at home. I can only imagine all the turkeys roasting right now, yumm!


I am not a salad person, but I do love all greens, but cooked. I make it a point to add something green everytime I make dal, or parathas or a stir fry. I started buying Kale on;y a few months back and I love roasting them into chips. But the last two times I got distracted and they ended up burnt. So I made this thoran instead and I loved it. The best part is that kale doesn't wilt as much as the other greens, it retains its texture and I love that.

Kale Thoran


Ingredients:
1 bunch kale
2 tsps oil
1/4 tsp mustard seeds
1 tsp split urad dal
2 whole dry red chilies
a pinch asafoetida
50 gms fresh grated coconut
2 garlic cloves
few curry leaves
1/4 tsp turmeric powder
1 tsp red chili powder
1 tsp cumin powder


Method:
Wash the kale and remove the tough ribs. Chop finely.
Crush the coconut, garlic, red chili powder, turmeric powder and cumin powder in a mortar and pestle or pulse in a food processor.
Heat a pan and add the kale leaves, some salt and sprinkle some water and cover and cook on medium heat until the leaves are tender and all the water has cooked off. 
In another pan, heat the oil. Add the mustard seeds, when they splutter and the urad sal and fry until golden. Add the dry red chilies and asafoetida and the curry leaves. Fry for a few seconds and then add the coconut mixture. Mix well and cook for a few seconds, then add the cooked kale and mix well. Reduce the heat to low, cover and cook for 5 minutes. Remove from heat and serve hot.

Mawa Rava Coconut Laddoo


I have always loved celebrating Diwali....the lights, bright colors, sweets and even the fireworks. I have never been interested in the religious aspects of any festival but I like celebrating them all and Diwali is one I really look forward to and I have such wonderful memories of time spent with family and friends on this auspicious day. 
I really wanted to do it all this year, but ended up falling sick and was down for most of the day. But I didn't want to miss out on all the fun and a few pills can do wonders. Was up by evening and quickly made these laddoos. We had a few friends over and even burnt a few sparklers, the kids absolutely loved it. Hope everyone had a wonderful Diwali!

Mawa Rava Coconut Laddoo


Ingredients:
1 cup rava
1/2 cup coconut
3/4 cup very fine sugar
2 cups mava
4 cardamom pods
2-3 tbs milk (if required)
2 tsp ghee
few cashews and raisins


Method:
Remove the cardamom seeds and crush them fine, discard the pods.
Heat the ghee and roast the cashew nuts and raisins until golden. Drain and keep aside. 
Add the rava to the same pan and roast on medium heat until aromatic and the rava just begins to change color. Remove from heat.
Roast the coconut in the same pan for a few minutes until it seems a little dry, but take care not to brown the coconut. 
Remove from heat and mix the rava, coconut, sugar and cardamom powder together in a bowl.
Heat the mava on low heat until soft and melted. Add to the rava mixture and mix well. Mix in the raisins and cashew nuts. Cool for a few minutes.
Form small laddoos adding milk only if necessary.
Store in the fridge in an airtight container for a few days. Let sit at room temperature for an hour before serving.

Whole Wheat Spicy Methi Crisps


It has been over a year that I have made any kind of fried food at home. Except for the ocassional meal at a friends house or so, I have completely avoided fried foods since last Diwali and it wasn't as difficult or impossible as I thought it would be. But it is that time of the year again and a perfect excuse to indulge in everything I have been denying myself.
I always make Murukku and Ribon Pakoda, two of my favorite snacks. I addition to those, we have one more snack this year, these methi chips, which is really just crispy fried thepla. They are just the perfect evening snack, spicy and crunchy!

Spicy Methi Crisps


Ingredients:
1 cup whole wheat flour
1/3 cup gram flour/ besan
1 tsp red chili powder, or to taste
1/4 tsp turmeric powder
1 tsp coriander powder
2 pinches asafoetida
1 1/2 cups fresh methi leaves, chopped
2 tbs oil
salt to taste

oil to deep fry


Method:
Combine all the ingredients in a bowl. Add enough water to form a stiff dough. Divide into small portions. Roll out each ball as thin as possible and cut into squares. Separate the squares and deep fry on medium high heat until light brown and crisp. Cool and store in an airtight container.

Creamy Pumpkin Kheer with Cashew Nuts


With Diwali just around the corner sweets are all I can think of. There are a few I would like to make and then Manoj has his favorites that he wants me to make and his list keeps getting longer! I've not yet made up mind, but I bought a block of Mawa this weekend, I just keep thinking of all the possibilities...


In the mean time, here is a very simple but delicious kheer recipe. I tried carving a pumpkin for the first time this year, made a few wrong cuts and ended up with a lot of pumpkin to cook with. This is a recipe from the book, 5 spices 50 dishes by Ruta Kahate, and it's one dish I love to make, especially when having guests over. It's an easy one and tastes even better after it sits for a while, so you can even make it ahead of time.

Creamy Pumpkin Kheer with Cashew Nuts


Ingredients:
2 cups finely grated pumpkin
2 1/2 cups whole milk
2 tsp rice flour
1 tbs water
1/2 to 3/4 cup sugar, as needed
6-8 cardamoms, seeds removed and crushed to a fine powder
12 raw cashews, chopped coarsely
1/4 tsp nutmeg powder


Method:
Steam the grated pumpkin until soft. about 10 minutes.. Set aside.
Bring the milk to a boil, reduce heat and simmer until the milk thickens a bit, about 10-15 minutes.
Make a paste of the rice flour and water and add to the milk. Add the sugar and stir to dissolve.
Add the pumpkin, cashews and cardamom and mix well. Simmer for about 10 minutes so the flavors meld.
Stir in the nutmeg and remove from heat.
Serve hot or cold.

Halloween Cake Pops


Halloween is so much fun when you have a kid at home. Anushka is a lady bug this year and her costume comes with wings and she has been wearing it and 'flying' around the house ever since I bought it a couple of weeks ago. We already had a party last weekend in our apartment complex and another one in school today. I'm so looking forward to trick or treating with her in the evening and another party tomorrow! There is too much candy in the house!!
We had a halloween potluck at Anushka's school today and I finally got a chance to make cake pops! It was the cutest treat for their tiny hands and mouth. I had so much fun making these and they were really easy too. Will definitely be making them more often.


Every recipe I checked called for boxed cake mixes and frosting and I just can't imagine using them. So I just made one of my favorite chocolate cakes and chocolate buttercream frosting and bought candy coating from Micheals and it turned out just fine! I used two 9" round chocolate cakes and got about 42 cake pops. For the pumpkin stems I initially used tictacs, but hard mints and cake don't really go together, so I just pulled them off and piped some chocolate in their place.

Cake Pops


Ingredients:
Chocolate Cake (Recipe here), I increased the recipe by half and baked them in two 9" pans
Chocolate Buttercream (Recipe here), I halved the recipe, but you won't need all of it
Candy Coating, about
oil based candy colors
Lollipop Sticks

Method:
Bake the cake and cool it completely. Crumble it well, making sure there are no big pieces of cake left.
Add frosting a little at a time, and mix well until you have a mixture that is the consistency of play dough. 
Line a baking sheet with parchment paper. Roll the cake mixture into smooth small balls and place on the parchment. I used a small icecream scoop to get uniform balls. Cover with plastic wrap and refrigerate for several hours until firm or you can freeze them for 15-30 minutes. The cake balls must be firm but not frozen.
Melt the candy coating according to package instructions and color it as needed. If the melted candy is too thick you can thin with shortening or plain vegetable oil. Take it in a deep container so its easy to dip, I used a plastic glass.
Work with a few cake balls at a time, keep the rest in the fridge. Dip about 1/2 inch of the end of a lollipop stick into the melted chocolate and stick it into a cake ball, not more that halfway through. Then hold the stick and dip the entire cake ball into the melted candy until it is completely covered and remove it one fluid motion. Gently shake off any excess coating gently and stick it into a styrofoam block until it dries and hardens completely.


To decorate:
To make the jack-o'-lanterns or the ghost faces, melt some black colored candy coating and pipe the eyes, nose and mouth using a No. 3 tip.
I used green candy coating and a No. 5 tip to pipe the pumpkin stems.
For the purple pops. I just drizzled some melted orange candy coating.
If using sprinkles, before the candy coating hardens, dip the cake pops into the sprinkles, so they stick.

Store the cake pops in an airtight container for upto one week.

Sabudana Thalipeeth


I was cleaning my kitchen cabinets yesterday and I found two unopened packs of sabudana. Soaked a couple of cups immediately to make two of my favorite snacks. I used half to make khichadi for breakfast and was planning on making vadas for our evening tea. But the vadas are quiet tricky to make and mine always end up soaking too much oil. So, I settled on making this thalipeeth instead. The ingredients for the two are almost the same, and they even taste the same, just that the thalipeeth is pan roasted while the vadas are deep fried. I like to have mine with some sweetened yogurt, sprinkled with chili powder and chaat masala, Yumm!

Sabudana Thalipeeth


Ingredients:
1 cup sabudana (tapioca pearl), soaked overnight
2 big potatoes, boiled and mashed
1/2 cup roasted and skinned peanuts, coarsely crushed
4-5 green chilies, finely chopped, or to taste
2 tbs fresh grated coconut
1 tsp cumin seeds, roasted and crushed
1/2 tsp sugar
salt to taste
handful of cilantro, finely chopped
ghee

Method:
Combine all the ingredients except the oil and mix together really well to form a dough. Make slightly larger than a lemon sized balls of the dough. Grease a plastic sheet and pat down the balls of dough with your fingers into discs about 1/4" thick and make a hole in the center.
Heat a pan on medium heat and brush with some ghee. Place one disc on the pan and put a few drops of ghee in the center. Roast for about two to three minutes each side until golden brown and cooked through.
Serve hot with your favorite chutney or some sweetened yogurt.

Pav Bhaji with Homemade Whole Wheat Pav (Mixed Vegetable Curry with Whole Wheat Dinner Rolls)


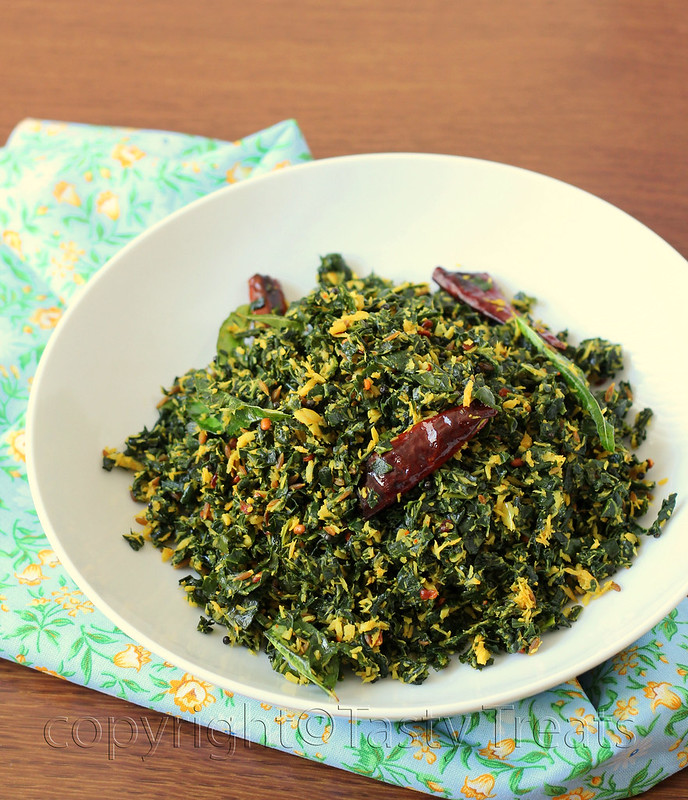
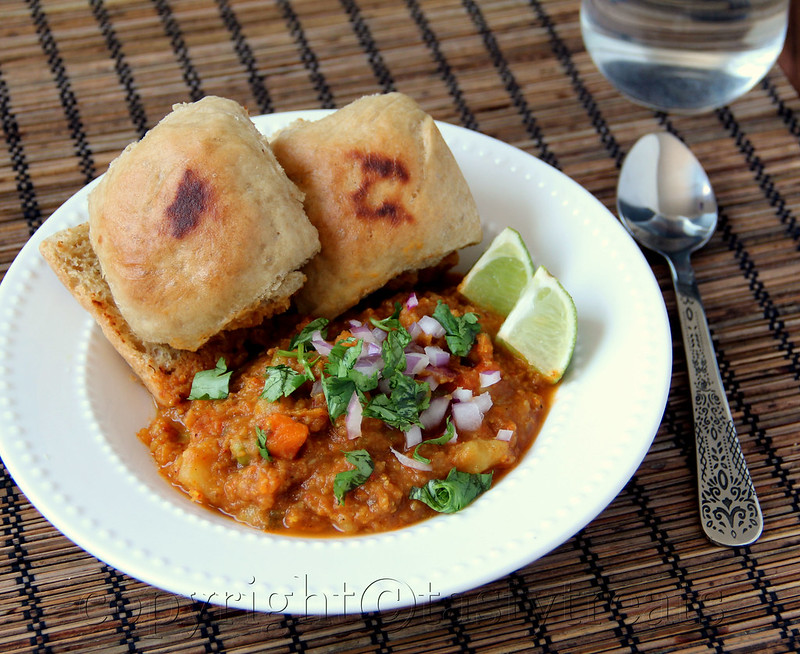
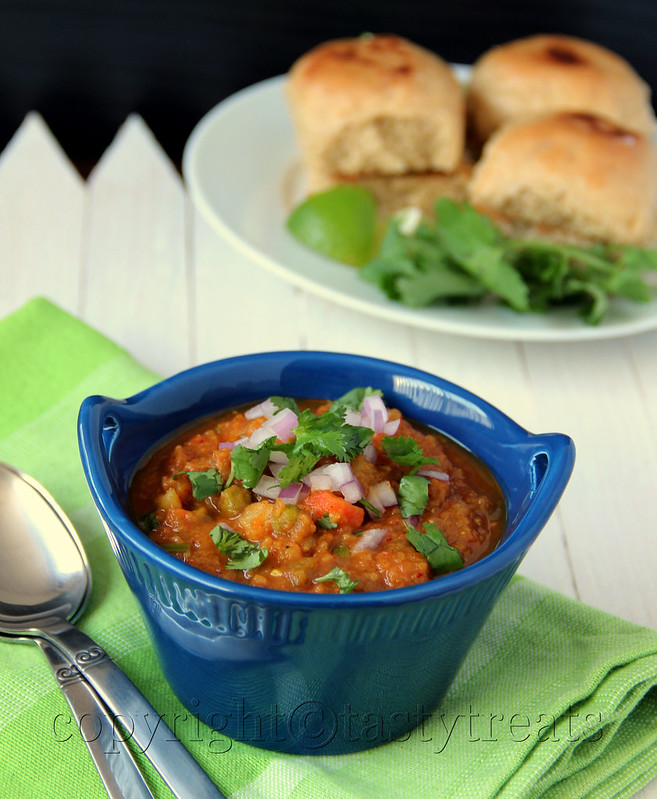
Pav Bhaji is a spicy mix vegetable curry served with buttered and toasted bread rolls. One of the most popular street foods in Mumbai, there are many restaurants and food stalls all over famous just for their Pav Bhaji. When I was working and during college days I probably visited all of them and I've loved every dish I had. And yet I firmly believe that nothing tastes as good as home made pav bhaji and I still think my mom's is the best. It was one of the meals my brother and I would so look forward to! She always made a huge batch on Saturdays that we would relish through the weekend.
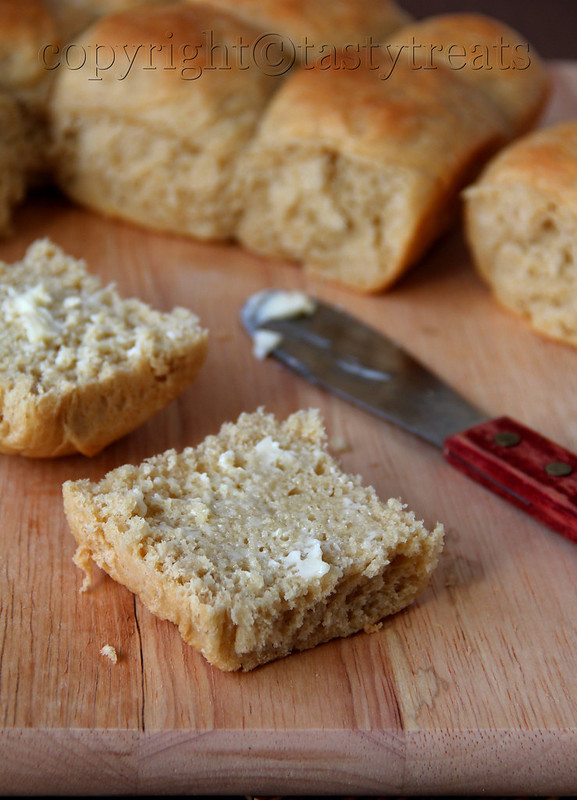
I make pav bhaji about once a month and have started making pav at home too. This recipe is mostly adapted from Vaishali's Holy Cow and it's one I really like and I love the flavor of the bread when using some whole wheat flour instead of all white.

Whole Wheat Pav


Ingredients:
1 1/2 - 2 cups warm water
1 1/2 tsp active dried yeast
2 tsp sugar
1 1/2 cups whole wheat flour
1 1/2 cups bread flour
1 tsp salt
2 tbs oil


Method:
Mix 1/2 cups of water, sugar and yeast in a bowl and keep aside for about 10 minutes until the mixture turns frothy. Sieve the flours together and add the to the yeast mixture. Add the remaining water slowly as needed while kneading the mixture until you have a smooth but slightly sticky dough. Add the oil and knead for another couple of minutes.
Transfer the dough into a big greased bowl and roll to coat all over with oil. Cover with a kitchen cloth and keep aside for about 2 hours in a warm place until the dough has risen to almost double.
Punch the dough and knead lightly. Divide into 9 portions and shape into balls.
Place in a greased pan in rows, close together but not touching.
Cover with the kitchen cloth and place in a warm place for them to rise. They will join at the ends and touch each other forming a slab.
Bake in a preheated oven for about 20 minutes. Insert a toothpick to check if done.
Take the pan out of the oven and brush the tops with some melted butter. Return the pan to the oven for 5 more minutes so the tops get browned.
Remove from pan and cool on a wire rack.
To serve with the bhaji, split each pav into half, spread some butter and toast until golden. Serve hot.

Bhaji


Ingredients:
1 big potato, about 350 gms
half cauliflower, about 250 gms
1 small carrot
1/2 cup green peas
3 big tomatoes, blanched and peeled
6 whole dry red chilies, I used half kashmiri chilies, for their color, or to taste
1 big onion, finely chopped
1 small capsicum, finely chopped
1 tbs ginger garlic paste
1/4 tsp turmeric powder
1/2 tsp garam masala powder
1 1/2 - 2tbs pav bhaji masala
salt to taste
2 tbs butter


Method:
Cook potato and all the other vegetables and mash them all together into a coarse mixture.
Grid the tomatoes and chilies into a smooth puree.
Heat 1 tbs oil in a big pan and saute the onions and capsicum and until the onions are golden brown.
Add the ginger garlic paste and fry for a minute.
Add the turmeric, garam masala and pav bhaji powders and fry for a few seconds.
Stir in the tomato mixture and cook until the water evaporates and the oil separates.
Add the vegetable mixture and salt and mix well. Add some water to adjust the consistency.
Bring to a boil. cover and cook on low heat for about 10 minutes.
Uncover and check the seasonings. Stir in the butter and remove from heat.
Serve hot with toasted pav and some lemon wedges, chopped onion and cilantro on the side.

Butterscotch Cupcakes with Cashew Praline


A few of us friends meet up once every week for a potluck lunch. It's an afternoon I really look forward to... great homemade food, gossip, silly jokes and endless laughter. I am happiest when I have to bring dessert and I so look forward to trying out something new.
I really wanted to make cupcakes this time and ofcourse all I could think of was a chocolate one with a  rich ganache frosting. But I forced myself to go a different route and I'm so glad I did. The recipe is from The Butch Bakery Cookbook and calls for maple syrup, but I decided to use butterscotch sauce instead and it was fabulous. It was my first time tasting the sauce, its heavenly!! The frosting is a simple whipped cream frosting flavored with the same sauce and I topped each cupcake with a piece of cashew praline.

Butterscotch Cupcakes


yields 18 cupcakes
Ingredients:
2 cups all purpose flour
1 1/2 tsps baking powder
1/4 tsp salt
10 tbs (1 1/4 sticks) unsalted butter, softened
1 cup firmly packed light brown sugar
3 large eggs, broken into a small bowl
2 tsps vanilla extract
1/3 cup milk
1/3 cup butterscotch sauce (recipe below)

1 1/2 cups heavy whipping cream
1/2 cup butterscotch sauce, 

Method:
Preheat oven to 350F/ 180C. Line muffin pans with liners and keep aside.
Sift together the flour, baking powder and salt. Keep aside.
Beat the butter and brown sugar on medium high speed until well combined.
Add the eggs one at a time, beating well after each addition. Beat in the vanilla extract.
Scrape the sides of the bowl and add half the flour mixture and the milk, beating to combine.
Add the rest of the flour and the butterscotch sauce, and continue to mix just until the dry ingredients are incorporated, scraping down the sides of the bowl as needed.
Fill the muffin cups, about 3/4th full.
Bake, rotating the pans halfway through, for about 20 minutes or until done. 
Leave the cupcakes in the pan on a rack for 5 minutes and then remove from the pans and cool on the racks completely before frosting.


For the frosting:
Make sure the cream, bowl and beaters are chilled.
Take the cream and butterscotch sauce in a chilled bowl and beat on low to combine and dissolve the sauce in the cream. Raise the speed to medium high and whip until stiff peaks form. 

Frost the cupcakes as desired and top each with a piece of praline. You can also crust the praline into little bits and sprinkle on top of the cupcakes.

Butterscotch Sauce
Ingredients:
4 tbs (55 gms) salted butter
1 cup (180 gms) packed dark brown sugar
1/4 cup (60 ml), plus 6 tbs (90 ml) heavy cream
1/2 tsp vanilla extract

Method:
In a wide saucepan, melt the butter with the brown sugar and 1/4 cup cream, stirring until smooth.
Without stirring, let the mixture cook at a bubbling simmer for 3 minutes.
Remove from heat and stir in he remaining cream. Let cool a bit and stir in the vanilla extract.

The sauce should be served warm. It can be stored in the refrigerator for upto 2 weeks. Reheat the sauce over low heat.

Cashew Praline
Ingredients:
1/2 cup sugar
1 tsp light corn syrup
1 tbs water
pinch of salt
1/3 cup cashews, toasted and crushed into small pieces

Method:
Grease a baking sheet and keep aside.
In a small saucepan, combine the sugar, water, corn syrup and salt over medium high heat and stir constantly until the sugar dissolves.
Continue to cook, without stirring until deep amber. 
Remove from heat and stir in the nuts. Spread evenly on the greased baking sheet.
Let cool completely over a rack. Break into small pieces.

Sacher Torte


Any chocolate cake lover would have probably heard of the famous Sacher Torte. There is a great story behind the cake and the original cake is only sold by the Hotel Sacher. I so wish I get a chance to have it sometime! You'll find several recipes online and in books but the original one is a well kept secret.
I made this for my birthday back in August. It was a major one this year, 30!! Called for a special treat and the Sacher Torte seemed perfect! This one is from the book 'chocolate' by Linda Collister and  it surely took me to Chocolate Heaven!! 

Sacher Torte


Ingredients:
7 oz bittersweet chocolate, finely chopped
1 stick plus 4 tbs butter at room temperature
3/4 cup sugar
5 extra large eggs, separated, plus one egg white
1 cup all purpose flour
1/2 tsp baking powder

Apricot Glaze:
1/4 cup apricot preserves
1 tsp lemon juice

Chocolate Frosting:
1/2 cup heavy cream
7 oz bittersweet chocolate

a little melted milk chocolate to pipe (optional)
whipped cream to serve


Method:
Grease and line a 9" spring form pan with parchment paper
Preheat oven to 325F.
Melt the chocolate over a double boiler and set aside to cool.
Beat the butter until creamy, add half the sugar and beat until light and fluffy.
Add the five yolks, one at a time, beating well after each addition. 
Stir in the cooled chocolate.
Sift the flour and baking powder into the chocolate mixture and fold in gently with a large metal spoon.
Take the six egg whites in a large grease free bowl and beat until stiff peaks form, then beat in the remaining sugar, 1 tbs at a time.
Fold into the chocolate mixture in three batches.
Spoon into the prepared pan and bake till done. Check at 25 -30 minutes.
Cool in the pan for 10 minutes then invert onto a cooling rack, remove the parchment and cool completely.

To make the glaze. put the apricot preserves, lemon juice and 1 tbs water in a small saucepan. Heat gently and bring gently to a boil, stirring constantly. Remove from heat and push through a strainer into a bowl. 

Brush the hot glaze over the top and sides of the cake. Let cool on the wire rack.

To make the frosting, put the cream in a small saucepan and heat until almost boiling. Place the chocolate in a bowl and pour in the hot cream. Leave for 2 minutes and then stir until the frosting is smooth and glossy.

Set a plate under the wire rack to catch the drips and then pour the frosting over the cake so it completely covers the top and the sides. Use a spatula if necessary to cover any bare patches. Let set in cool place, but not the refrigerator.

If liked pipe the word 'Sacher' or an 'S' with the melted milk chocolate. 

Serve with some whipped cream on the side. For best results, before each cut, dip the knife in hot water and wipe it dry.
Store the cake in an airtight container in a cool place. Best if eaten within a week.